Baleen as a Service
The next upgrades for Baleen are a background daemonization and scheduled ingestion cycle as well as a fancy web application for making sure everything works smoothly. It is our hope that Baleen in this context will do far better at ingestion than one off collects by a human being. Our back-of-the-napkin architecture is as follows:
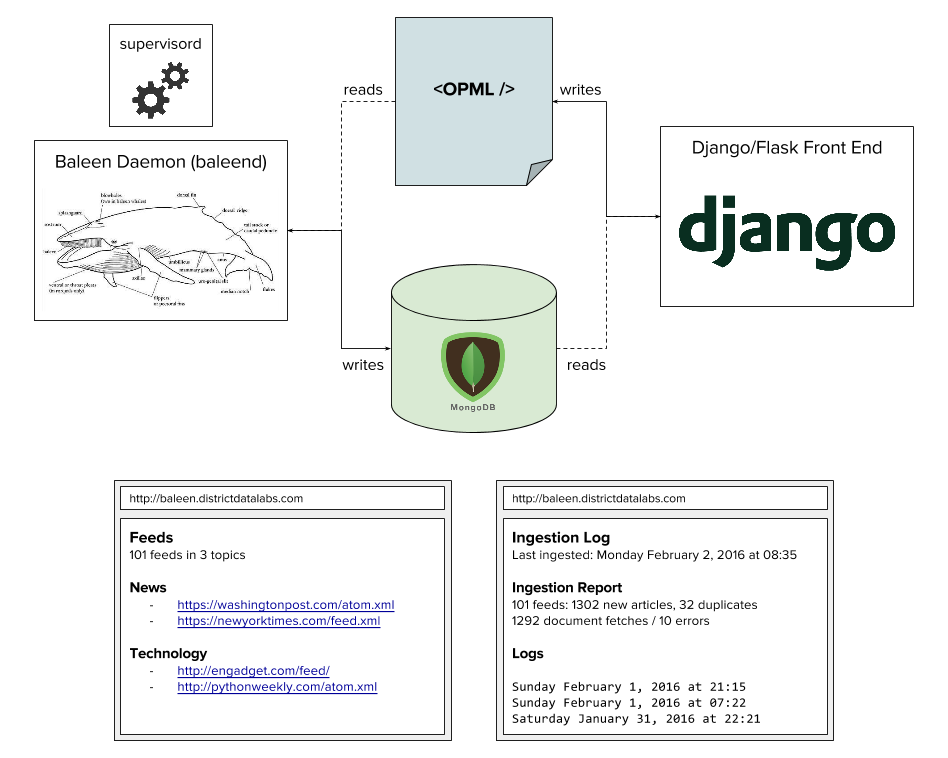
Requirements and features will grow in the future; and hopefully be less napkin-y. But that's it for now!
Deployment
These are some notes I took while deploying Baleen to an Amazon EC2 instance. These notes aren't “deployment instructions” necessarily, but rather a rough guide of what I had done previously to get started. Use them at your own risk!
EC2 Setup
I launched an EC2 instance using the AWS console with the following configuration:
- AMI: Ubuntu Server 14.04 LTS (HVM), SSD Volume Type
- Instance Type: General purpose t2.small (estimated $19.04 per month)
- Storage: 96 GiB General Purpose SSD EBS Volume (estimated $6.60 per month)
The EC2 instance was tagged with the database (MongoDB) and service (Baleen), and configured to a new security group called baleen that allows ingestion-specific ports. After configuring SSH, I changed the hostname to baleen.districtdatalabs.com and edited the home profile for the ubuntu user to add my various aliases and commands. Again for reference (will probably have to move these to a gist or something), they are:
alias ls="ls -CF"
alias ll="ls -lhF"
alias la="ls -lhFA"
alias ld="ls -d"
alias ..="cd .."
alias ...="cd ../.."
alias get_python_lib="python -c 'from distutils.sysconfig import get_python_lib; print get_python_lib();'"
alias ts='date +%F-%H%M%S'
alias update="sudo apt-get update && sudo apt-get upgrade"
alias fhere="find . -name "
alias df="df -Tha --total"
alias du="du -ach | sort -h"
alias free="free -mt"
alias ps="ps auxf"
alias psg="ps aux | grep -v grep | grep -i -e VSZ -e"
alias top="htop"
alias myip="curl http://ipecho.net/plain; echo"

# virtualenv
export WORKON_HOME=/var/envs/
export PROJECT_HOME=/var/apps/
source /usr/local/bin/virtualenvwrapper.sh

alias venv="workon"
alias venv.exit="deactivate"
alias venv.ls="lsvirtualenv"
alias venv.show="showvirtualenv"
alias venv.init="mkvirtualenv"
alias venv.rm="rmvirtualenv"
alias venv.switch="workon"
alias venv.add="add2virtualenv"
alias venv.cd="cdproject"
alias venv.cdsp="cdsitepackages"
alias venv.cdenv="cdvirtualenv"
alias venv.lssp="lssitepackages"
alias venv.proj="mkproject"
alias venv.setproj="setvirtualenvproject"
alias venv.wipe="wipeenv"
Now to install various tools with the Ubuntu package manager, aptitude:
$ sudo apt-get update && sudo apt-get upgrade
$ sudo apt-get install python-pip python-dev \
    build-essential git \
    libxml2-dev libxslt1-dev zlib1g-dev
And installing Python packages with pip:
$ sudo pip install -U pip virtualenv virtualenvwrapper
Make the virtualenv directories:
$ sudo mkdir /var/envs && sudo chown ubuntu:ubuntu /var/envs
$ sudo mkdir /var/apps && sudo chown ubuntu:ubuntu /var/apps
The 96 GiB EBS volume was added separately to the 8 GiB root volume. We therefore have to configure fstab to automatically mount the EBS volume on every system reboot. To see how to use EBS volumes, format, and mount them see Making the Volume Available on Linux. As per the instructions, I mount the EBS volume to /data. Note, this is where all of MongoDB has to live, as well as log files and any other extensive data!
MongoDB Setup
Install the MongoDB Community Edition as instructed by the MongoDB Ubuntu Installation Guide. Although you could use the Ubuntu default packages, it is preferable to add the community edition packages so that things are up to date, and so that you can get all the utilities. Installation should be as simple as copy and pasting the commands from the tutorial.
Configuration, on the other hand, needs a bit more thought. By default MongoDB stores its data files in /var/lib/mongodb and its log files in /var/log/mongodb. However, we're going to want data and logs stored on our mounted EBS volume at /data. First create the appropriate directories:
$ sudo mkdir /data/logs && sudo chown -R ubuntu:ubuntu /data/logs
Next edit the /etc/mongod.conf file ad edit the systemLog.path and storage.dbPath options to point them to the correct directories. The configuration should look something like:
# Where and how to store data.
storage:
  dbPath: /data/mongodb
  journal:
    enabled: true

# where to write logging data.
systemLog:
  destination: file
  logAppend: true
  path: /data/logs/mongodb/mongod.log

# network interfaces
net:
  port: 27017
  bindIp: 127.0.0.1
Note that on Ubuntu you will also have to edit the /etc/init/mongo.conf startup script and edit the paths to match the configuration values. This service script is also the thing that will create the /data/logs/mongodb and /data/mongodb directories and set the permissions accordingly. Alternatively you could set these directories up yourself. If MongoDB is not running after you start it, it's most likely a permissions issue.
Baleen Setup
The strategy we'll use to deploy Baleen is to clone the repository to /var/apps/baleen. We will then create a virtual environment in /var/envs/baleen in order to maintain our Python packages there. It is the hope that we can then simply update Baleen by pulling from our desired branch. This mechanism has a few complications over pip install (we have to add a .pth file so that import will find baleen), but as we're in a development mode right now, it may be easier to just pull.
$ cd /var/apps
$ git clone https://github.com/bbengfort/baleen.git
$ cd baleen/
$ venv.init -a $(pwd) -r requirements.txt
$ echo $(pwd) > $(get_python_lib)/baleen.pth
In order to run Baleen as a background service, we will use upstart, Ubuntu's event based init daemon. This is also how MongoDB is started and stopped as well. Let's move our configuration files as follows:
$ sudo cp conf/baleen.conf /etc/init/
$ sudo cp conf/baleen-example.yaml /etc/baleen.yaml
You can edit the /etc/baleen.yaml as required for the system, probably something like:
# Basic Flags
debug: true

# Logging Information
logfile: '/data/logs/baleen/baleen.log'
loglevel: 'INFO'

# Use Requests to fetch complete HTML
fetch_html: true

# Database Information
database:
    host: localhost
    port: 27017
    name: baleen
Make sure that the configuration is working by printing the settings:
>>> from baleen.config import settings
>>> print settings
You should see your configuration data, which means it worked! Next import the OPML feeds as follows:
$ bin/baleen import fixtures/feedly.opml
If everything is setup with the Python app and environment, this should work without issue. Next up, start the baleen service:
$ sudo service baleen start
You can check if it's working by using the psg baleen command (one of the aliases added above). If you're having trouble see what's going on in /var/log/upstart/baleen.log or the baleen log itself.
That's it! Baleen should now be running once an hour, every hour!